Carefully review Display Height Adjustment steps 1-5
located to the right before using the ENS.
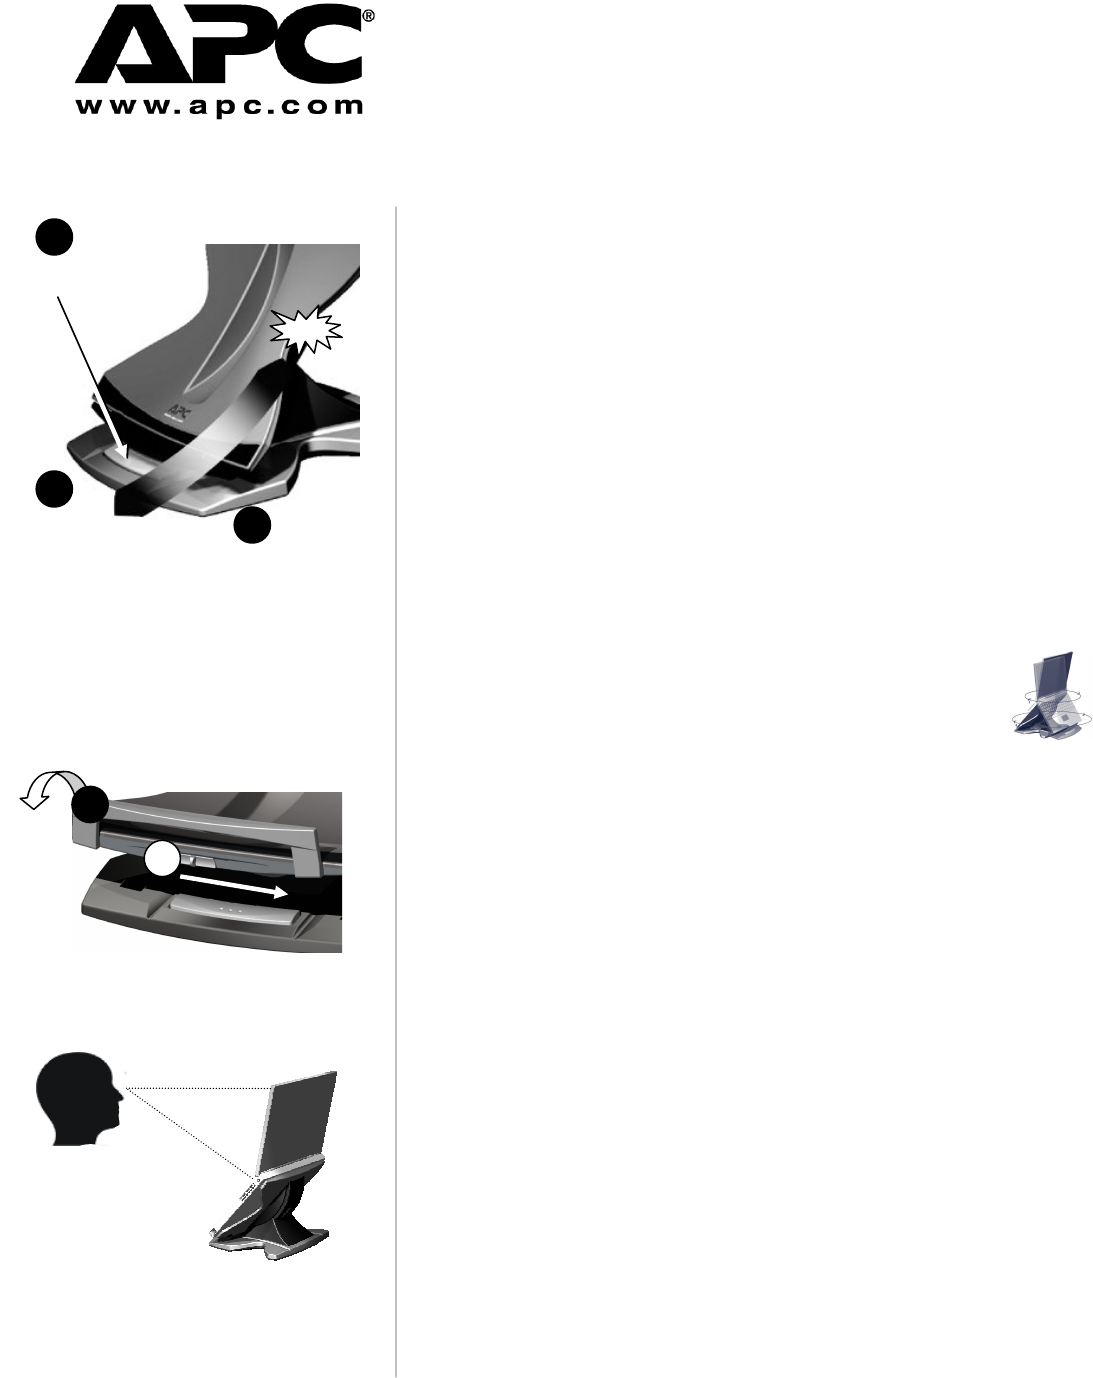
DO NOT REMOVE HAND FROM COOLING
CRADLE UNTIL YOU HEAR THE “CLICK”,
INDICATING IT HAS LOCKED INTO POSITION.
Cooling
Cradle
Display Height Adjustment
Front Drive Access
Press silver
Actuator Button
on unit’s base.
(Release
button for Cooling
Cradle to lock into
Thank you for purchasing an APC Ergonomic Notebook Stand. Please fill out the
warranty registration online at http://www.apc.com/support/inter_warranty/.
FEATURES & HOW THEY FUNCTION
Display Height Adjustment (Actuator Button): Pressing the Actuator Button allows you
to adjust the position of the Cooling Cradle and thereby your notebook’s display height to
any one of four preset positions. To change positions perform the following steps:
1. Clasp the corner of your notebook and the bottom of the Cooling Cradle so your
notebook and the Cooling Cradle are firmly grasped between your thumb and fingers.
2. Press down on the Actuator Button (located on unit’s base) with your other hand.
3. Push the Cooling Cradle forwards or backwards approximately ½ inch and release
pressure on the Actuator Button. When you hear a “click”, the Cooling Cradle has
firmly locked into one of the four preset positions.
4. Release your clasp on the Cooling Cradle and your notebook once you are certain
the Cooling Cradle has locked into position.
5. Repeat steps 1-4 to raise or lower system to next preset position.
Front Drive Access (Folding Retainer): The Folding Retainer located on the bottom
of the Cooling Cradle allows you to gain quick access to drives, bays or buttons
located on your notebook’s front edge. Lower the Cooling Cradle to its lowest position.
Push the ‘slide switch’ (on front of Cooling Cradle) towards the right and, gently pull the
retainer towards you. When finished, push the retainer back to its original position to
lock it into place. Do not push on the retainer to adjust height of the Cooling
Cradle.
360 Degree Rotation: Non-skid rollers on the bottom of your unit allow it
to rotate 360
o
to share your notebook’s display or access rear connections.
Cooling Cradle: Your notebook sits on top on the Cooling Cradle and is held securely
in place with a series of non-skid surfaces. It has been designed to increase airflow of
cool ambient air around your notebook. This accelerates notebook cooling which can
aid in increasing your notebook’s performance, battery life and even longevity.
Integrated 4 Port USB 2.0 Hub (ENS-USB models only): A 4-port USB 2.0 Hub is
integrated into your ENS-USB. All ports are located at the rear side of the unit’s base.
Use these ports to access the unit’s docking capabilities. These high speed ports
support USB powered peripherals such as external keyboards, mice, printers,
scanners, hard drives, optical drives, etc.
PLACEMENT OF YOUR ERGONOMIC NOTEBOOK STAND (ENS)
Proper configuration of your workstation may help relieve back, shoulder and neck
strain that often accompany long hours of working on a notebook computer. For a
complete set of instructions on how to properly set up your workstation, see the US
government’s CDC website: http://www.cdc.gov/od/ohs/Ergonomics/compergo.htm.
LCD Screen: Adjust height so the top of your notebook’s display is at or just below
eye level when you are properly seated in an upright position. Move the ENS so that
your notebook’s LCD screen is approximately 18-30 inches from your eyes.
Keyboard and Mouse: An external keyboard and mouse are recommended when
using the ENS. Adjust keyboard height so your forearms are parallel to the floor
(approx 90 degree angle at elbow). Adjust the slope of your keyboard so that the backs
of your wrists are flat (in a neutral position), and not bent back while typing. Your
mouse should be at the same height.
Proper Display Height
18’’ – 30’’
Adjust display height so screen is 18’’ – 30’’ from
your eyes and display is at or slightly below eye level.
Grasp Cooling
Cradle &
notebook in
lower corner.
Slide Cooling
Cradle up or down
until “click” is heard.
Click
Ergonomic Notebook Stands
(ENS, ENS-USB)
User’s Manual
 Manymanuals.com
 Manymanuals.de
 Manymanuals.fr
 Manymanuals.it
 Manymanuals.pl
 Manymanuals.cz
 Manymanuals.es
 Manymanuals-pt.com
Comments to this Manuals